The Crash Course Wood Model Making Of Joy-Cons And Grip
Not too long ago I attended a model making course, don’t ask me why but I did. It was going to be a fun process I guessed, so I went with it, plus it was not one of the long dragged out courses, it was sort of a basic touch-and-go course. Still, I never went in and expected myself to come out making a set of Joy-cons and Grip.
On the first day of the wood model lesson, we were quickly introduced to basic woodworking. You would think that there is a lot of theory and stuff, but the teacher just ran through the few machines we were allowed to touch and gave us a block of wood-plastic composite to start our work. We were asked to choose an electronic device to work on.
“That’s easy,” I thought. I’ll just do my favourite gaming console, the Nintendo Switch. However, when I showed a picture of the Nintendo Switch, the teacher looked at me with eyes of disappointment. He was expecting something more organic looking, something with more curves, like a mouse, which is what about a quarter of the class chose.
But I was adamant, I wanted to do something related to the Switch, not some gaming mouse. And there I was, starting my journey to create a wood model of the Nintendo Switch Joy-cons and Grip.

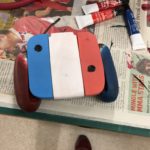
To make things easier to sculpt, I cut three blocks of wood out and shaved two of them into the curves of the grip on the sandpaper machines. So far so good, I did the same with the centrepiece as well. But things start to go awry from there on. On the milling machine, the grip’s recess was over-cut on the bottom and things just went straight through. Then, glueing the pieces together was another yucky mess. There was just not enough surface area for the glue to work its magic, the whole piece ended up weak and broke as I was filing the curves.

However, I was not going to give up then and just make a mouse like most of the others. I have my pride too (haha). So I took the time and redid the grip with the lessons I’ve learnt from the first one. Firstly, I reduced my time at the sandpaper machine and spent more time actually filing the curve, this allowed me to have more control on the form of the grip. The curves turned out better and less lopsided than the first attempt.
I also designed a “dove-tail” like piece (I know it is not a real dove-tail) to increase the surface contact for the glue to work. Though my milling skills were still rubbish, already the grip looked much better and stronger than before.

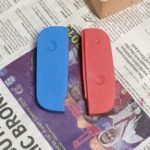
Of course, work was not done. I had to smoothen the rough curves, file certain areas, but at least it was time to work on the Joy-Cons. The Joy con’s smooth surface and relatively straight corners was relatively easier to work with and in no time, things looked not too bad.

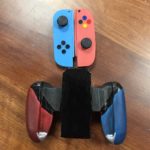
Then it was time to make the slotting mechanism, it is the Grip after all, you need to be able to slot the controllers in. I did make the pieces with the intention to do so in the first place. Turns out it was not easy, my teacher even recommended me to just glue everything together and fill up the gaps. But I was adamant, the Joy-Cons had to be removable! So I went about making them removable but true to the teacher’s words, it was not easy. Even after careful calculations, and careful milling, the slot was too tight here and there. I ended up filing a whole lot in places that struggled to fit. In the end, it managed to fit, although the right joy con did seem like it was a little over filed.

The Grip and Joy-Cons were then quickly puttied and smoothed to make sure that any chips and bumps were almost not visible. Then I headed off to make the joysticks for the Joy-cons.

The turning machine was fun and as the machine had digital controls compared to the other milling machines, the joysticks turned out a lot better than I expected. We’ll take a look at them later but for now, it’s painting time.
As I owned a pair of Neon Blue and Neon Red Joy-cons, I thought I would just go with that. However, as I was intending to go for black on the grip, my teacher said that black was a very easy colour to paint and urge me to go for something else. I went for “Wine Red” and “Midnight Blue” for the grip’s ends and as I could not think of any colour other than black, I went for the easy choice and painted the centre region black.
Continuing on, I painted the centre slot regionn with a glossier coat of black and touched up a few details.

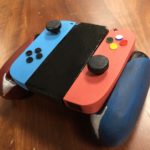
For the finishing touches, all I had to do was to add the details in. As the 72 mm acrylic buttons were hard to carve letters on so I decided to paint colours on to them instead. I initially wanted to draw a Switch logo in the centre as well but I quickly screwed it up and had to do a damaging cover-up. But after all the hard work here’s the end result!
It was not a simple task, especially for a beginner like me to go from blocks of wood to a full model. In fact, if you put my Grip next to the actual Joy-Con Grip, the difference is immediately telling. Still, at least for now, I’m satisfied with my work and hope that Nintendo actually releases a “Wine Red/Midnight Blue” Joy-Con Grip.
